- Published on
Creating a serverless REST API with Cosmos DB on Azure (Part 1).
What is serverless computing
By now, you may have heard of the term serverless computing (or serverless functions). But suppose you haven't; in a nutshell, serverless computing is all about abstracting the user away from the complexity of provisioning, maintaining and configuring servers and letting the developer focus on what they do best - coding.
Microsoft Azure offers their serverless implementation that is called Functions. Functions are simply pieces of code hosted in the cloud that numerous types of events can trigger. These can take the form of timers, data manipulation events and even HTTP calls. The following example will cover creating a simple REST API with an Azure Cosmos DB as the data store. Cosmos DB (formerly known as Document DB) is Azure’s implementation of a No SQL database.
It is free to get up and running with Azure – When you create a new account, you are given £150 ($200) of credit for a month to experiment with most of the services that Azure offers.
Creating the Cosmos DB service in Azure
First, we are going to create the Cosmos DB instance. Navigate to the new resource menu, → Search for Azure Cosmos DB and fill out the required creation settings. Here are the settings I used:
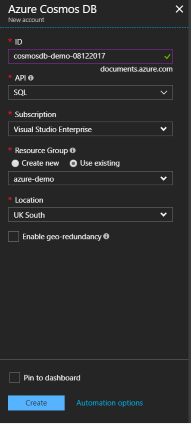 Cosmos DB creation settings
In this example, I choose to use the SQL API for querying data but feel free to select the option most familiar to you. We need to add a data collection to our database to see if our REST API works. For this demonstration, I have created a small data set of blog posts in JSON format that you can download here.
Adding a data collection to our Cosmos DB instance
Next, we need to download the Azure Cosmos DB database migration tool, which we can find at the following link. Once you have opened the tool, click next on the welcome screen → On the source information screen, leave the Import from drop down as JSON files, then click Next.
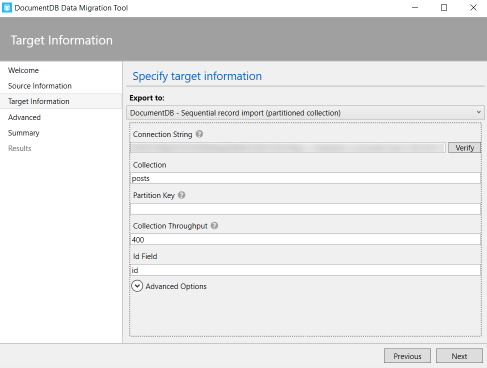
We need to enter the connection string for our Cosmos DB instance and specify a collection name for our JSON data on the target information screen. The tool demands the connection string in the following format:
AccountEndpoint={CosmosDB Endpoint};AccountKey={CosmosDB Key};Database={CosmosDB Database};
You can obtain the AccountEndpoint and AccountKey parameters from Azure by navigating to our Cosmos DB Settings section and clicking the Keys option.
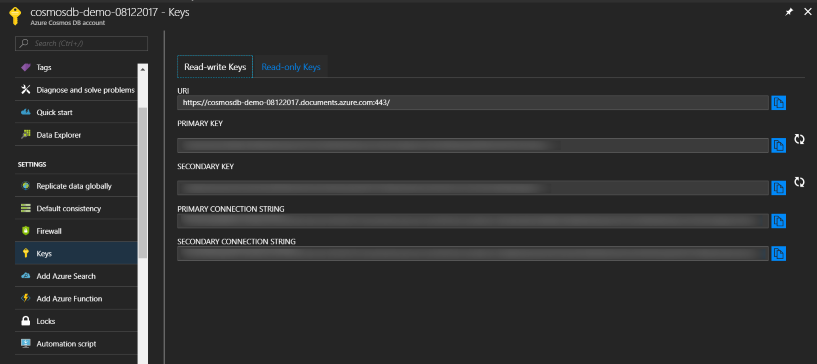
So to format the connection string for the data migration tool to use, copy and paste the Primary Connection String text from Azure and append "Database={CosmosDB Database};" by replacing {CosmosDB Database} with the name of the Cosmos DB instance that you chose. You can click Verify to confirm you got everything correct.
For the collection field, I will use posts to reflect the type of data we are doing to store.
The partition key field can be left blank, and the collection throughput set to the lowest value of 400 (cheapest cost).
The Id Field section requires the Id on our JSON data collection (think of this as the primary key). In my example, it is simply id. We can click through all the subsequent windows and click the import button. The tool will now add our JSON to Cosmos DB.
Creating the Azure Function App
Finally, we will create the Azure Function that will act as our REST API. Navigate to the new resource menu, → Search for Function App and fill out the required creation settings. I recommend using the consumption plan for hosting due to having 1 million free executions per month. Here are the settings I used:
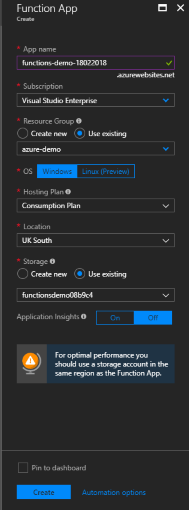
Now we have created the Function App, we need to make the actual REST API function. Go to the Function App resource → Click the '+' button next to the Functions option; click the 'Custom function' option on the next blade.
Azure will present you with several template options - Choose the C# HTTP trigger → Give a new function a name and authorization level (In this example, we will use Anonymous), then click create.
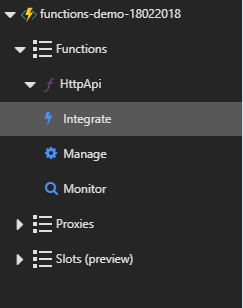
After we have created the function, a pane should display with the C# code that forms our HTTP API function. To pass in the data from our Cosmos DB as a parameter to the function, we need to add a new Azure Cosmos DB input. We can achieve this by expanding our function in the left pane and clicking the Integrate option.
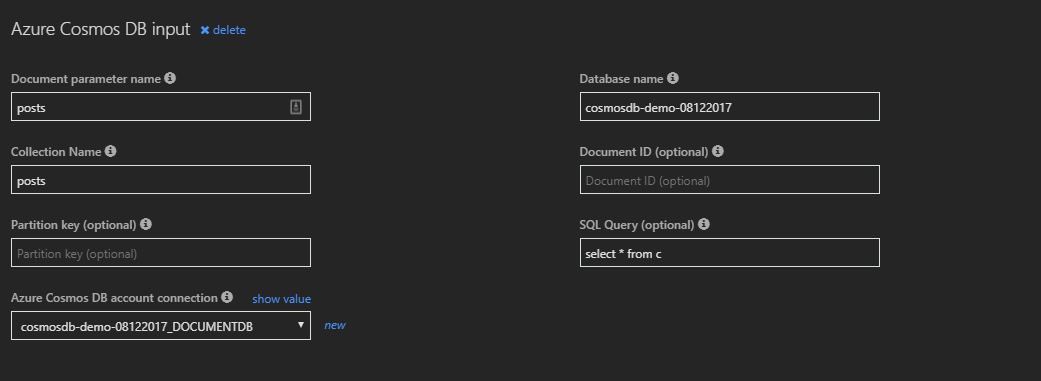
Azure should with a new window; click the New Input option at the top of the screen, select Azure Cosmos DB and match the values in the following screenshot. To add a new account connection, click the new button and remember that the Database name field is the name of the Azure Cosmos DB instance we created earlier.
Before hitting the Save button, take note of the SQL Query that will filter out the data available to our function - In our case, it will return all records in our posts collection. (The c in this context is an alias for our posts collection). Now hit the save button!
Now it's time to edit the function code to return all records in our posts collection. To do this, click the name of the function in the left pane and amend the C# code presented to the following:
using System.Net;

public static async Task<HttpResponseMessage> Run(HttpRequestMessage req, TraceWriter log, IEnumerable<dynamic> posts)
{
    return req.CreateResponse(HttpStatusCode.OK, posts);
}
The code is passing our input as a collection of dynamic objects. We need to use the dynamic type because we do not know the schema of our post object until the function gets executed at runtime. Note that the parameter's name matches up with how we configured our input previously.
Next, we can execute our function by clicking the Save and run button, and relying on that you got everything configured correctly, the list of posts in JSON format should appear in the 'Output' window.
Wrap Up
Hopefully, this has given you a greater insight into the power of setting up an Azure Function for tasks such as returning data and performing operations in the cloud without having to provision or maintain server hardware. This example demonstrates a reasonably simple implementation, but there are no end-use cases when using Functions on Azure.
In my next article, I will show how to add other data manipulation options to our function, such as adding and updating records in the Azure Cosmos DB.
Part two of this series can be found here.
